The top was glued up almost a year ago in preparation for the second try at Whit’s guitar. The back was sanded down to 3/16″ a few weeks ago. Here’s a gallery of the steps that go into getting a back ready.

First, the edges need to be trued up so that the two book-matched halves meet at a straight line and that the edges are at compatible angles. You want a 90-degree angle and a long edge that runs parallel to the wood grain. This little jig (above) that the padauk back boards are laying on is called a shooting board and is designed to hold the back (and top) so that the plane can put a clean, true edge on the boards. You’re done when you can hold the boards together, without applying any pressure, and no light shines through. My contribution to this technology is the two little knobs on the left side of the shooting board. These tighten runners that slide along a miter slot in my table saw. The table saw has a very flat granite surface for the plane to glide along.

This is the jig I built to hold and squeeze the top or back together for joining. It works great, but any luthier will recognize it as a Rube Goldberg device and say, “What’s wrong with just using tape?” Hey, I tried that and this works much better for me. And it was fun to build it. Well it was actually some kind of compulsion that took over after I botched yet another glue up.

The back is ready to be joined. The strip of rosewood will be glued in between the two halves to make a simple decorative detail.

The back has had glue applied and been strapped into the squeezer. This will stay clamped up for at least an hour. This one stayed clamped overnight.

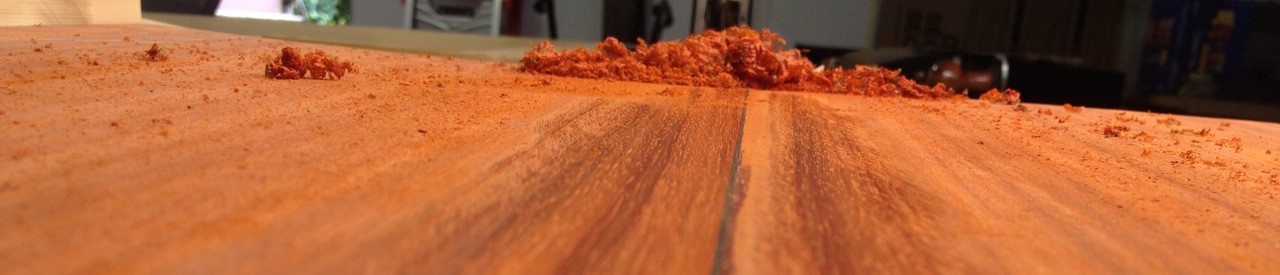
This closeup of the joint shows the glue squeeze-out. This is exactly how it should look. I’ve put as much pressure on the boards as can be done without breaking a board. That’s overkill on a well-made joint, and I think this is a good joint, but I’ll leave the “just rub the two sides together and let it sit a while” technique to the old guys.

Wood glue from Luthier’s Mercantile is our adhesive today. Good stuff — an industry standard. Joins oily rosewoods and doesn’t creep much. Don’t let it freeze, and don’t use it after it’s been on your shelf for over nine months.

Everything needs a name. I prefer something catchy, descriptive, and hyphenated. Should’ve been a marketer in the 1960s. But that would mean my kids would have been crazy 1970s reprobates like some people I know, so I’ll stay with the current timeline.

The following day, the strip of rosewood was planed down. The glue needs to be dry so that you don’t have a depression made by planing flat a joint swollen with wet glue, which subsequently dries and shrinks into a concave area. Every article in Fine Woodworking that shows a piece being made invariably shows a Lie Nielsen plane like this one being used. So here’s mine. A sweet, sweet Christmas 2011 gift from Karen, my first wife.

I use a scraper to take the rosewood down the last little bit. A scraper is just a rectangle of steel with a very smooth edge jointed 90 degrees to the “face” side. The sharp, 90-degree edge is then “turned” back toward the face a tiny bit by a smooth, hard burnisher. This puts a very effective little cutting edge on the scraper. It makes a curl, just like a tiny plane. Sounds simple to set up this tool, but I haven’t really had an “a-ha!” moment yet with my sharpening technique. Always an adventure… Later on we’ll bend some sides. Thanks for reading.